The rise and rise of cloud computing services has made it easy for developers to experiment with various enterprise deployment techniques. One of those techniques is blue-green deployment, which involves provisioning two production environments and then toggling between them when deploying a new version of the system. The new code is first deployed to the staging environment, validated, and then that environment is made live, with the previously live environment becoming the new staging environment. Advantages include zero downtime when deploying and the ability to easily roll back a release. This post details how I implemented blue-green deployment in Amazon Web Services (AWS).
The Web site
I implemented blue-green deployment for a theoretical Web site called londontamed.com. The site has two server-side components: the Web site itself and a Web service. Both components get deployed together on a Web server, with a production environment consisting of multiple instances of these Web servers. The database for the system is shared between the live and staging production environments. There is nothing of note about the site itself, rather I focused on creating a realistic build and deployment process.
The basic components
As stated in the introduction, blue-green deployment requires two production environments. I implemented each in AWS as an autoscaling group with an appropriate launch configuration The autoscaling group handles creating and then maintaining the desired number of Web server instances, with the associated launch configuration determining the Amazon Machine Image (AMI) to use when launching new instances in the group. I used the immutable server pattern, so that when deploying a new version of the site the existing instances get discarded rather than being updated.
I used packer.io to create the AMIs. I first created a generic AMI with nginx and Node.js installed on it. (The scripts for this are in the webserver directory.) Then I used this as the base AMI for generating another AMI, this one with the Web site and Web API code installed on it, with the new launch configuration referencing that AMI. I also used ServerSpec to automatically test each generated AMI. (The scripts for creating the second AMI are in the deployment/webserver directory.)
I used Elastic Load Balancing (ELB) to route traffic to the instances in an environment. There are two load balancers, one for each of the two production environments (live and staging). I used alias records in Route 53 to route traffic to a particular load balancer. So, for a request to the Web service or the Web site, it gets routed by Route 53 to the appropriate load balancer, which in turn forwards the request to one of the instances in the autoscaling group it balances the load for. I also made use of SSL termination in the load balancers to simplify the set-up of the instances, since they then only need to handle HTTP traffic.
Security set-up
I created a private Virtual Private Cloud (VPC) for the site, rather than using the default VPC:
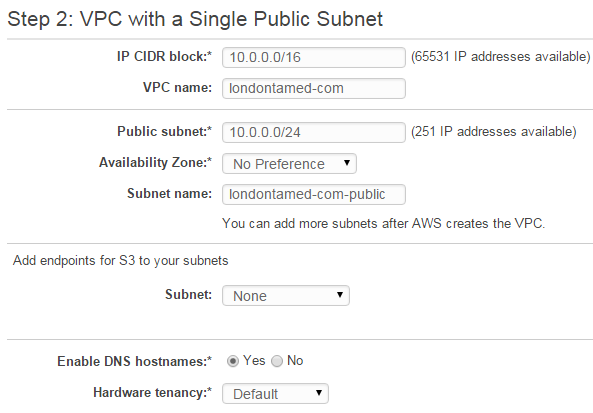
You could use the default VPC, but it is best practise to create a separate VPC for the site and use it as the means of controlling exactly who and what can access that system. Also, at the same time as creating the VPC, I created a public subnet named londontamed-com-public-1.
A load balancer in AWS require that you associate it with at least two subnets, so I then had to create a second subnet in my VPC:
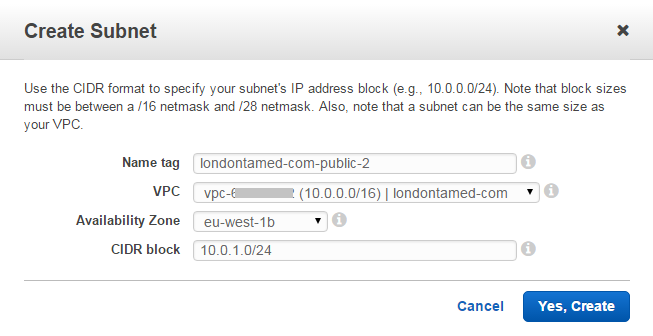
I had to change the route table that is used by this second subnet to be the same as the route table used by the first subnet. I also used the EC2 Dashboard to create a security group called londontamed-com-production:
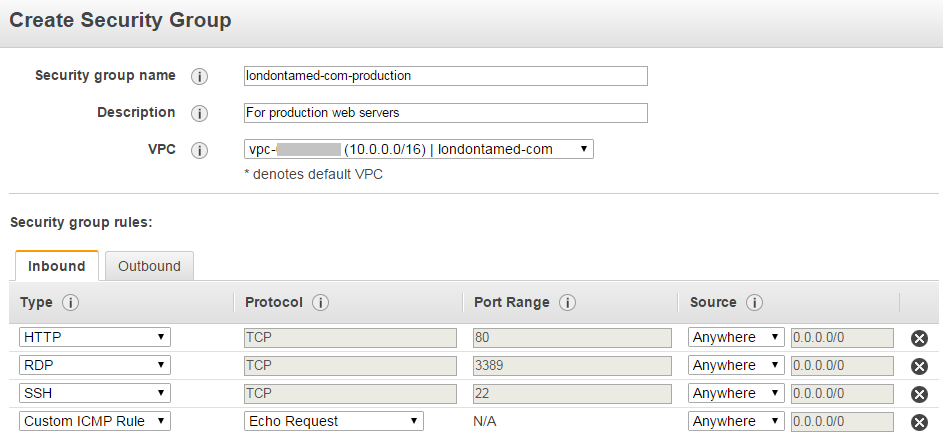
I set up the Inbound rules like so:
| Type | Protocol | Port Range |
|---|---|---|
| RDP | TCP | 3389 |
| SSH | TCP | 22 |
| HTTP | TCP | 80 |
| Custom | ICMP Rule Echo Request | n/a |
| HTTPS | TCP | 443 |
| Custom | TCP | 3001 |
The HTTP rule needs to be for all sources, so 0.0.0.0/0. The other rules should have a source setting that locks the rule down to the IP addresses of whoever needs access. The custom port 3001 rule allows the load balancer access to a non-SSL health check port on an instance.
Finally, I created an Identity and Access Management (IAM) role called webserver with the AmazonEC2FullAccess managed policy, and I created a key pair in EC2 called londontamed-com-production.
Setting up load balancing
I used the EC2 Dashboard to create two load balancers. The name of the first load balancer is londontamed-com-production-1 and the security group is londontamed-com-production:
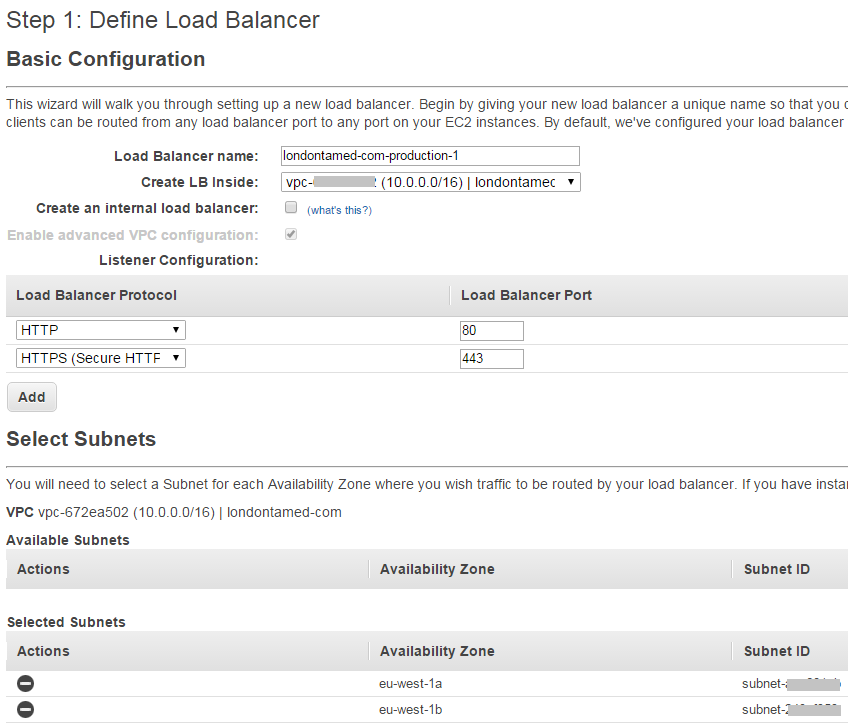
By default the load balancer gets configured with the HTTP protocol. You can add HTTPS as well if you supply an SSL certificate. The HTTPS protocol is configured by default to forward to port 80 (i.e., it implements SSL termination).
Setting up Route 53
As mentioned in the introduction, the site is called londontamed.com. On the live environment, the Web site is accessible as www.londontamed.com and the Web service is accessible as api.londontamed.com. On the staging environment, the equivalent domain names are www-staging.londontamed.com and api-staging.londontamed.com.
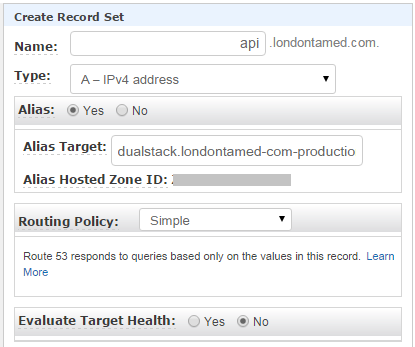
The live environment was configured in Route 53 as a public hosted zone with domain name londontamed.com. (note the trailing period). The zone contains two record sets, both alias records. The first is an A record for www.londontamed.com., with an alias target of the londontamed-com-production-1 load balancer as selected from the alias target dropdown menu. The second is an A record for api.londontamed.com., with the same alias target:
The staging environment was configured as a private hosted zone with a domain name of londontamed.com. (note the trailing period). The VPC for this zone is set to the londontamed-com VPC. This zone also contains two alias record sets. The first is an A record for www-staging.londontamed.com., with an alias target of the londontamed-com-production-2 load balancer. The second is an A record for api-staging.londontamed.com., with the same alias target.
Note that the alias target dropdown does not have any useful entries in it when you are setting up a private hosted zone. You can get the hostname for the second load balancer by temporarily setting the alias target for one of the public hosted zone A record sets to the second load balancer, then copying and pasting the name.
While I set this up so that the public hosted zone points to the first load balancer and the private hosted zone to the second load balancer, this is just the initial order. The load balancer that the record sets for each zone point to will swap over each time you go through the deployment process.
Deploying to the Staging environment
The set-up is now complete, so lets start deploying some code the blue-green way! I decided that I needed three distinct steps to the deployment process:
- Deploying the new code to the staging environment (deploy to staging).
- Altering the alias records in Route 53 to switch the live and staging environments (switch live and staging).
- Removing the old code from the old live environment (clean staging).
I decided to do the scripting in Python using Boto3, the AWS client for Python. I preferred this approach to, say, using the AWS CLI (command line interface) as it allowed me to easily create robust, cross-platform deployment scripts. The scripts are included in my teamcity GitHub repository, in the scripts directory.
To run these scripts, you need to set up your AWS credentials on the machine that you will use. The quickstart guide on the Boto3 Web site includes instructions on how to do this. Also, to simplify the scripts and the number of parameters that they require, I used convention over configuration regarding the naming of the various AWS objects. For example, the convention I use for naming the VPC is as per the domain name, but with periods replaced by hyphens, so londontamed-com. The result is that I have to pass far fewer parameters through to the scripts.
Deploy to Staging
This script is called deploy-to-staging.py. It creates a new launch configuration, uses it to create a new autoscaling group, and associates the autoscaling group with the staging load balancer.
Switch Live and Staging
This script is called switch-live-and-staging.py. It is run once you are happy with the new code on the staging environment and you want to make it live. It updates the alias records in Route 53 to do this, making the staging environment into the live environment and the live environment into the staging environment. You can also run this script to roll back a failed switch to live.
Clean Staging
This script is called clean-staging.py. It can be run once the new code is live and you are happy with the result. It deletes the launch configuration and the autoscaling group that is associated with the staging environment. It checks that both are not in use elsewhere in your AWS account. It is not necessary to run this script, but doing so means that you will have no unnecessary instances running and costing you money.
Alternative approaches to blue-green deployment
There are a few different ways to implement blue-green deployment in AWS.
Alias record updating
In this post, I have taken the approach of creating a new autoscaling group for the new code, associating the staging load balancer with it and then, when all instances in the group are ready and healthy, I alter the appropriate alias records in Route 53 to make it the new live environment.
I like this approach because, once the autoscaling group is up and running and the appropriate load balancer has been changed to point to it, you do not touch the group or the load balancer again; the switch to live happens within a different AWS system. This seems to me to be a very robust approach. A downside is that which load balancer is live and which is staging changes on each deployment, so it is possible that a mistake could be made and the wrong environment altered at some point. I deal with this in the scripts I created by validating the state of the AWS system at each stage in the deployment process.
Autoscaling group switching
An alternative approach is to have a live load balancer and a staging load balancer, and switch the new and existing autoscaling groups between them when you wish to make the new code live.
Autoscaling group updating
Yet another approach is to alter the existing autoscaling groups, rather than creating new ones. In this way there is a live autoscaling group which is always handled by the live load balancer, and a staging autoscaling group which is always handled by the staging load balancer. Deployment works as follows: first the IDs of the existing instances in the staging group are noted and the launch configuration for this group is changed to the new launch configuration. Those existing instances are then terminated one by one, with the changed launch configuration meaning that the new instances that get created in order to maintain the desired number of servers in the group are instances with the new code. The process is repeated on the live environment once the new code is validated on the staging environment.
An advantage of this approach is that any monitoring you have on the autoscaling groups does not need to be recreated on deployment, since you are altering the existing groups rather than replacing them with new ones. A major disadvantage is that switching environments takes much longer, since you have to wait for the new instances to be ready, plus an instance might fail to launch or the load balancer could report the group as unhealthy at some point during the change.
Conclusion
Blue-green deployment is a great way to create an automated and robust deployment process. AWS supports the technique well and allows for complete scripting of the process of deploying new code.
# Comments
Comments on this site are implemented using GitHub Issues. To add your comment, please add it to this GitHub Issue. It will then appear below.