Introduction
I recently did some work for Ocula Technologies, a startup that provides AI-driven retail insights to B2C companies. One task was to add Auth0 to a React Single-Page App (SPA). There are lots of knobs to adjust in an Auth0 tenant and I found it hard to understand exactly what effect they were having and how they related to each other. To tackle this, I spent some time creating a flow chart for each of two authorization-related scenarios in the SPA. I would like to thank Ocula for letting me share these flow charts in this post.
Caveats
The flow charts only cover the Authorization Code Flow with Proof Key for Code Exchange (PKCE) grant option for the Auth0 integration. This is the recommended flow for an SPA; see here and here.
I also assume that the SPA is using Auth0 in order to authenticate with some backend API. The SPA has to include a bearer token with each API request that it makes. In Auth0, that bearer token is called an Access Token.
Finally, I have included using a custom domain in the flow charts but I have not tested this. (Ocula had not yet started using a custom domain by the time my contract with them finished.)
Background
An Auth0 tenant contains a few key entities:
- The Application. You will have created one of these for the SPA (the client application).
- The API. You will have created one of these for the backend API.
- The Organisation. Your tenant will likely include one or more organisations that users can log into.
On the client-side, there are five moving parts to be aware of when using the Authorization Code Flow with PKCE:
- The Auth0 client configuration
- The Auth0 Session Cookie
- The ID Token
- The Access Token
- The Refresh Token
The Auth0 client configuration
I used the official Auth0 React SDK for integrating Auth0 with the SPA. This includes an Auth0Provider component for configuring the Auth0 client:
<Auth0Provider
  domain={YOUR_AUTH0_DOMAIN}
  clientId={YOUR_AUTH0_CLIENT_ID}
  audience={YOUR_AUTH0_AUDIENCE}
  redirectUri={YOUR_REDIRECT_URL}
  onRedirectCallback={onRedirectCallback}
  useRefreshTokens
  cacheLocation="localstorage"
>
  ...
</Auth0Provider>
Two of these settings are relevant for this discussion. There is useRefreshTokens, which partly determines if refresh tokens are used by the Auth0 client. It can be set to true or false. There is also cacheLocation, which is the location where the Auth0 client will store the ID, Access and Refresh Tokens. If set to memory (the default) then the tokens are stored in memory. They will disappear when the user refreshes the page, closes the tab or closes the browser. If set to localstorage then the tokens will be saved in local storage and so will be persisted.
Auth0 Session Cookie
The behaviour of this cookie is controlled by the following tenant-level 'Login Session Management' settings:
- 'Persistent session' (enabled or disabled).
- 'Inactivity timeout'.
- 'Require login after'.
You can navigate to these setting using the navigation sidebar in your tenant (Settings > Advanced).
Regarding the persistent session: if it is disabled then the Auth0 Session Cookie will be automatically deleted when the user exits their browser. However, the user might have their browser set to restore sessions. This would bring back the cookie the next time they use the browser, making the cookie effectively persistent.
The ID Token
The lifetime of the ID Token is controlled by the 'ID Token Expiration' setting on the Application in the tenant.
The Access Token
The lifetime of the Access Token is controlled by the 'Token Expiration (Seconds)' setting on the API in the tenant. For the Authorization Code Flow with PKCE, be sure to use that particular setting and not the 'Token Expiration for Browser Flows (Seconds)' setting.
The Refresh Token
Refresh tokens are only enabled for the Auth0 client if all of the following apply:
- 'Allow Offline Access' is enabled on the API in the tenant.
- 'Refresh Token Rotation' is enabled on the Application in the tenant.
useRefreshTokensis set totruein the client configuration.
If 'Refresh Token Rotation' is enabled on the Application then there are also a few 'Refresh Token Expiration' settings to consider:
- 'Absolute Expiration' (enabled or disabled).
- 'Absolute Lifetime'
- 'Inactivity Expiration' (enabled or disabled).
- 'Inactivity Lifetime'
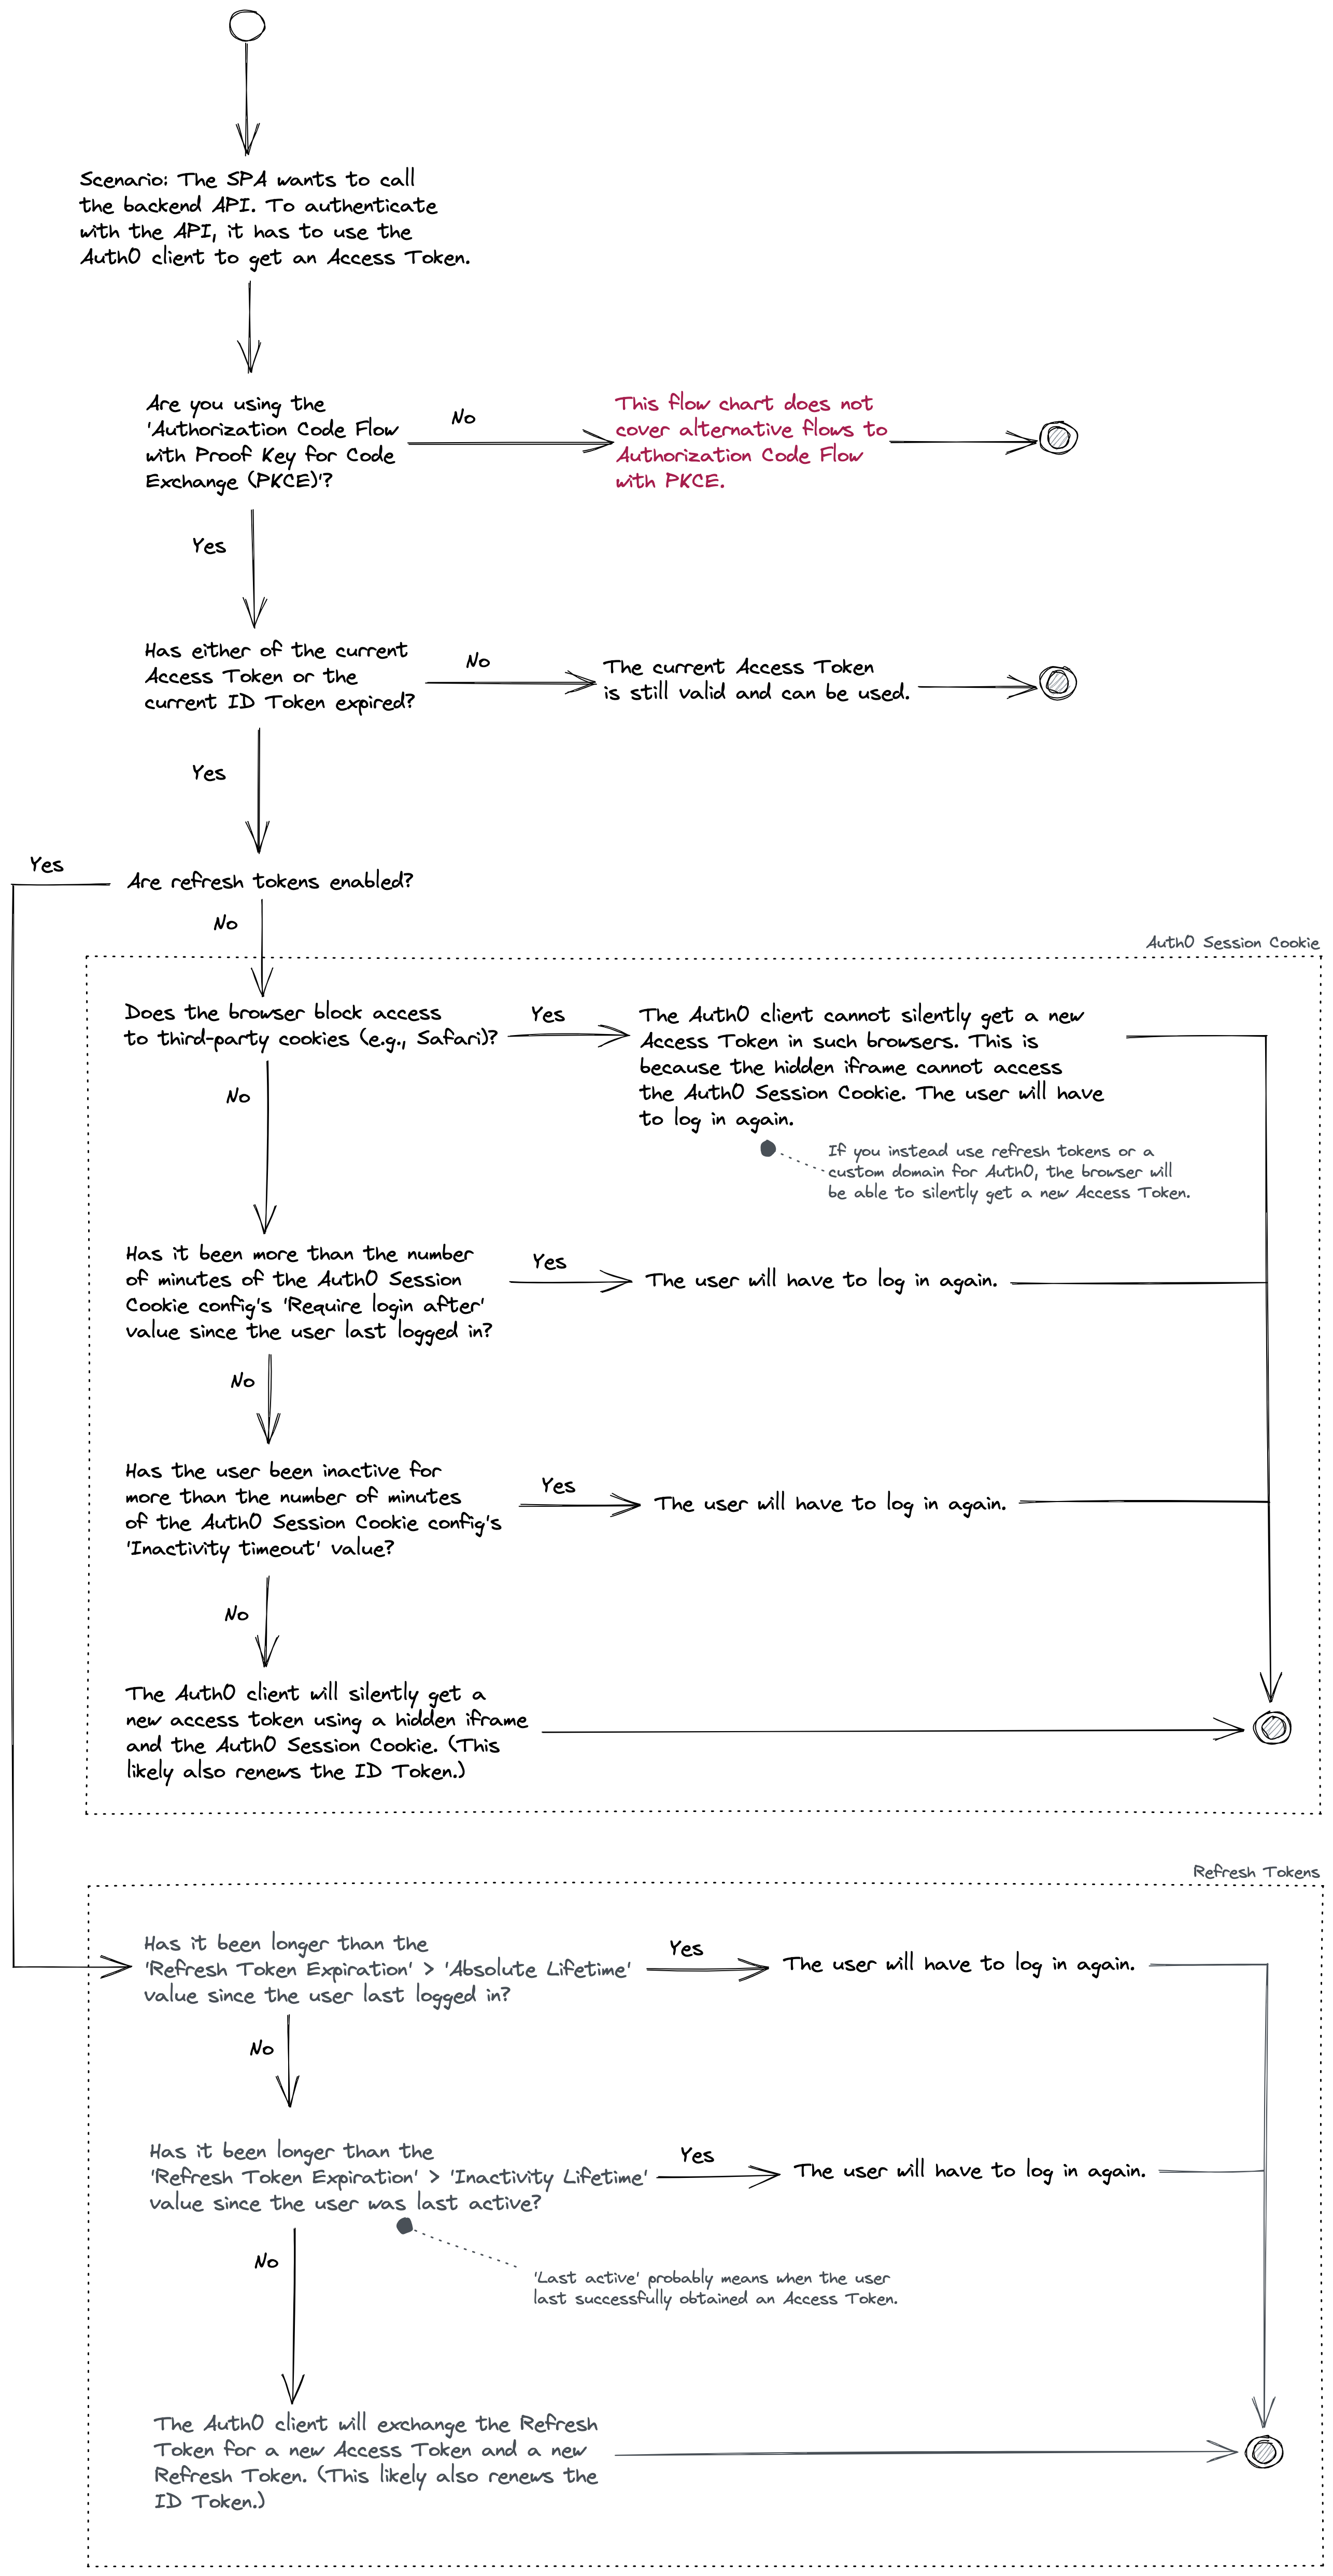
First flow chart: Obtaining an Access Token
This first flow chart covers the following scenario: the user is logged in, and the SPA needs to make a request to the backend API. To do this, the SPA uses the Auth0 Client SDK to get a valid Access Token.
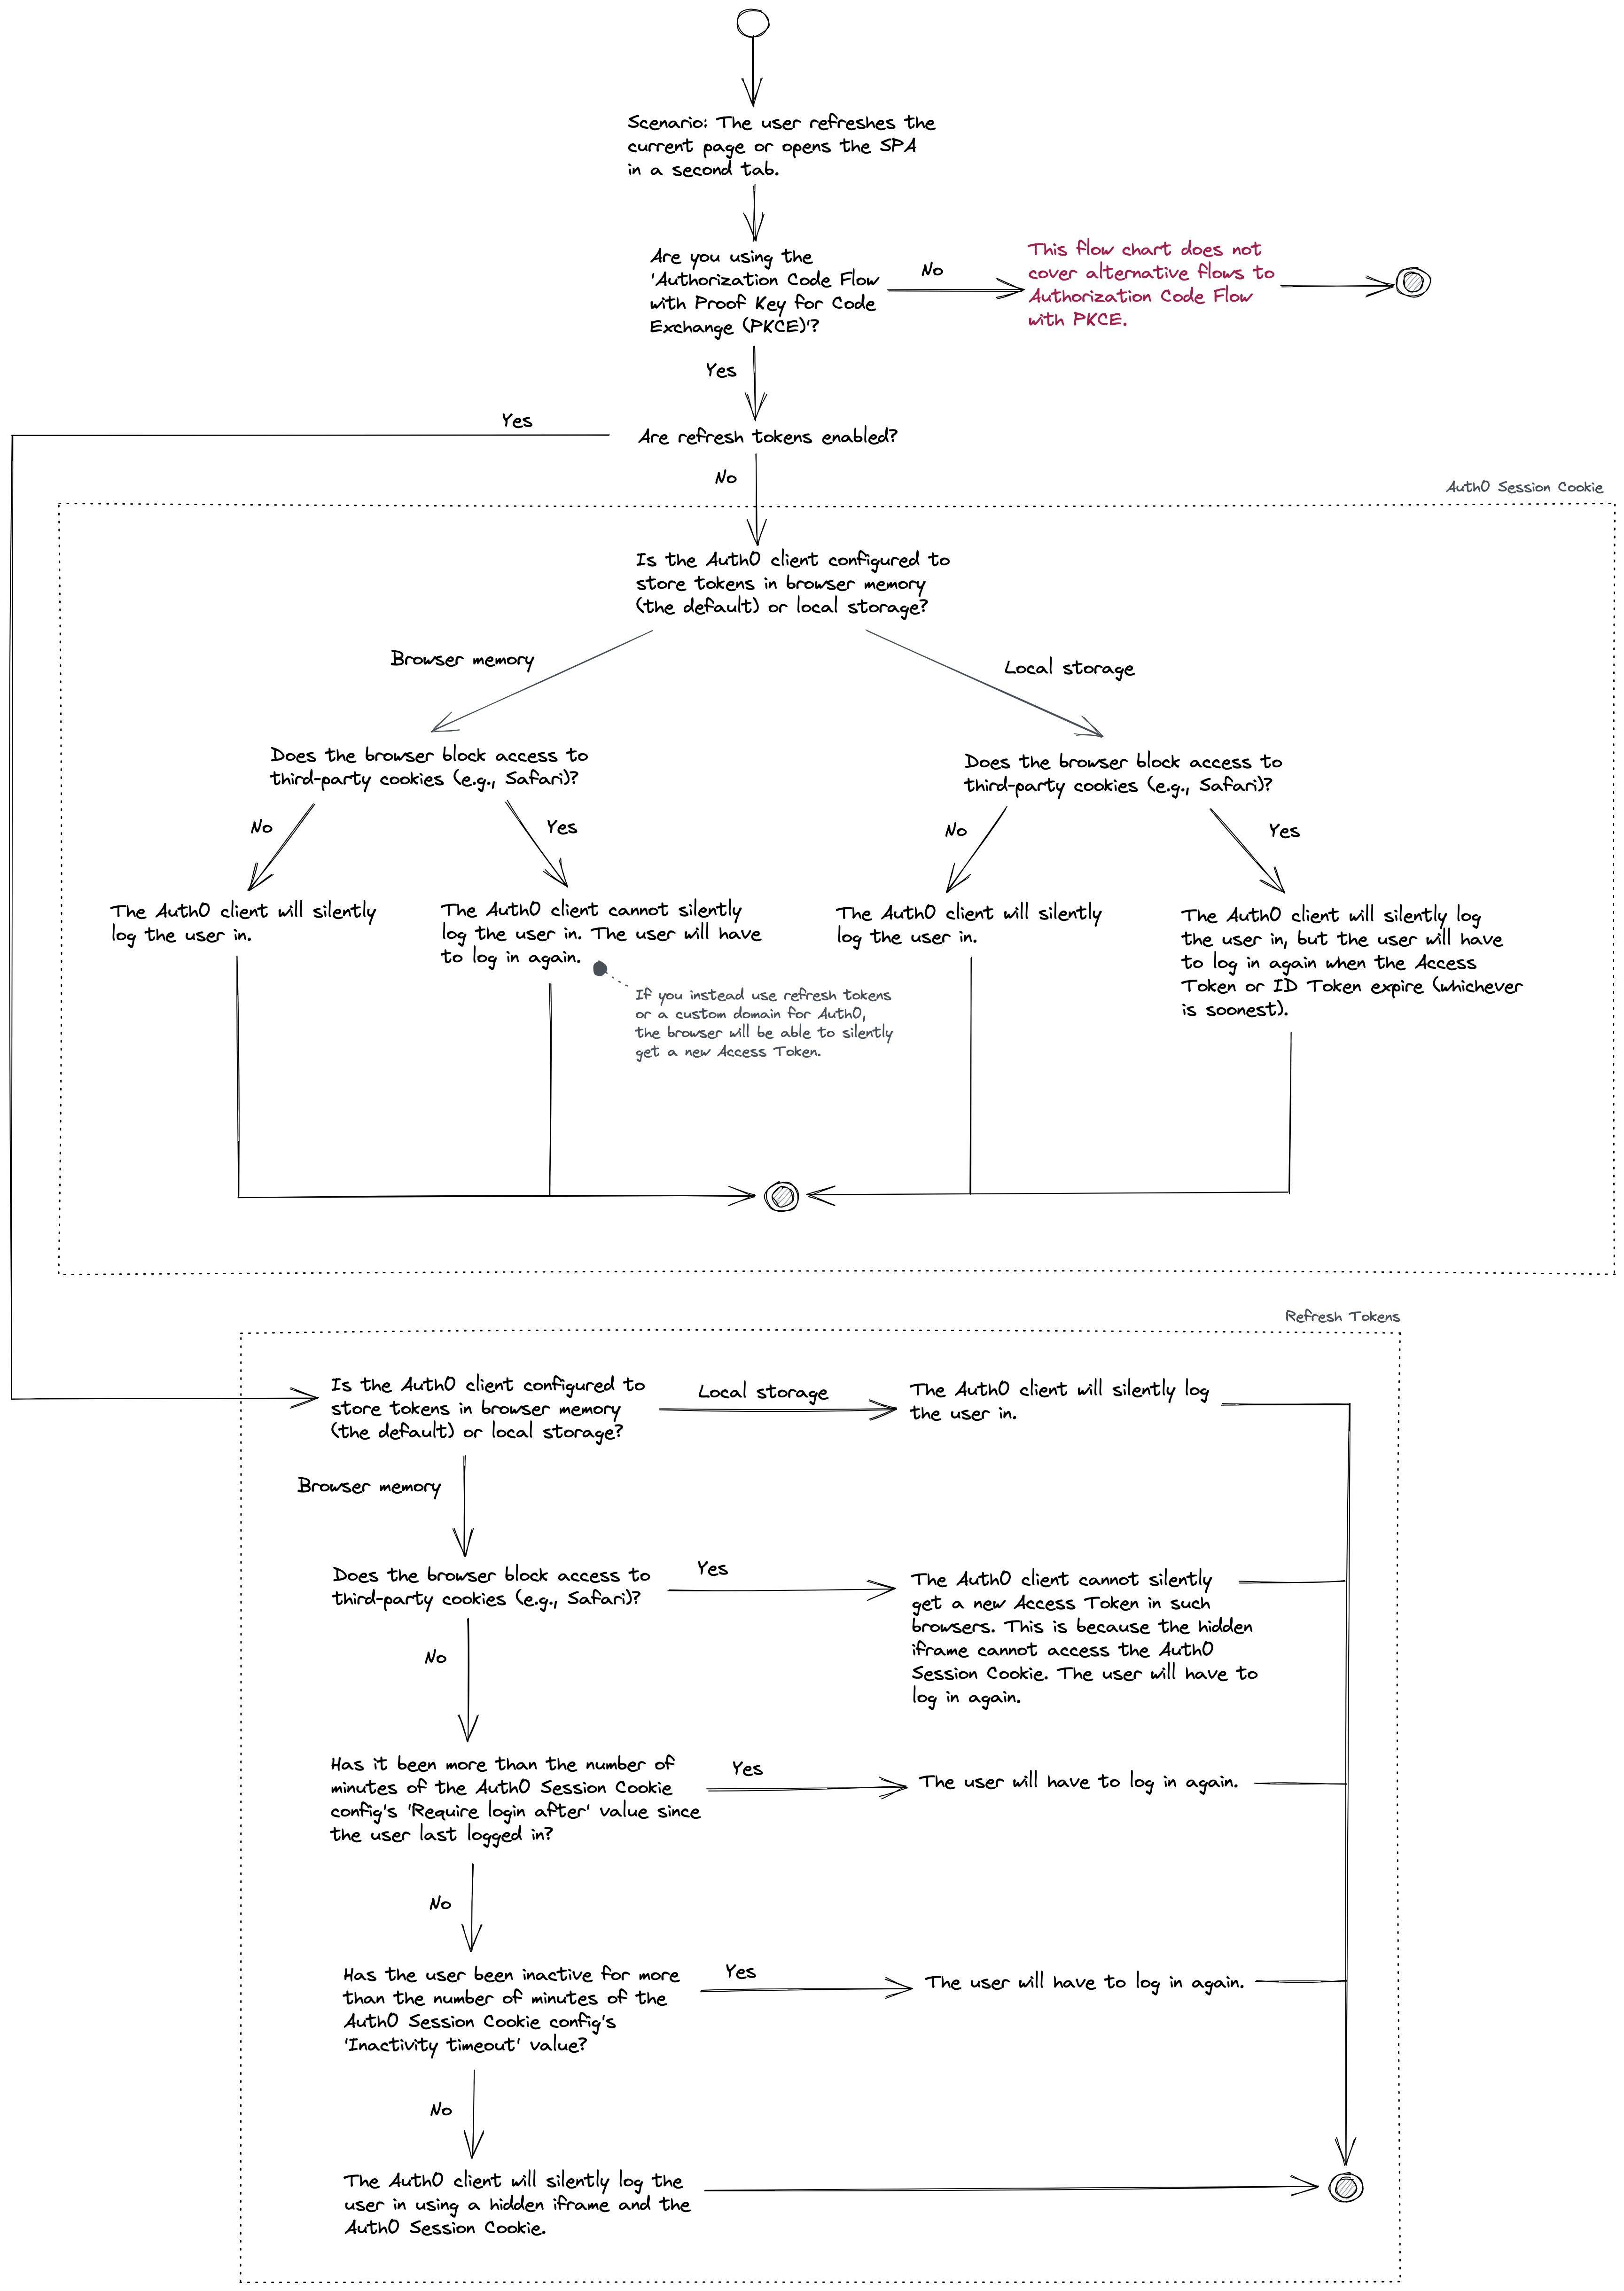
Second flow chart: The user refreshes the page or opens the SPA in a second tab
This second flow chart covers the following scenario: the user is logged in, and they refresh the current SPA page or open the SPA in a second tab. They may or may not continue to be logged in after this action.
Conclusion
Auth0 is straightforward to integrate with an SPA but fine-tuning its behaviour can be confusing. Hopefully the flow charts in this post will help you to better understand the choices you have and how they affect the user experience.
Changelog
- 2022-06-07 Initial version
- 2022-06-21 Made the flowcharts flow vertically for better display in the browser, and added extra link.
# Comments
Comments on this site are implemented using GitHub Issues. To add your comment, please add it to this GitHub Issue. It will then appear below.